Down to business
First things first. If you are not confident and competent in the field of electronics, please don't put your life at risk by poking around inside your video recorder. High voltages are present within it and touching them would be, at the least painful, and possibly fatal. I will not be held responsible for the health of those who choose to ignore this warning!Where has your machine been stored?
If it's been stored in a shed at the bottom of the garden, give up unless you are very determined and have LOTS of spare time on your hands. I was given a first-generation machine that had been stored under these circumstances and never did get it working entirely satisfactorily.The head drum was very badly corroded, as were all the connectors. Moisture also has a tendency to rot the pinch roller and lift the chrome from the capstan. You can kiss goodbye to any tapes that are run through a machine in a state like this.
Now for the good news! If your machine was stored indoors, you're laughing!
Firstly, give the unit a quick wipe with a damp cloth to remove as much dust from its case as possible. To remove the dust from the cooling slots in the machines lid, stand it up on its left-hand side and use a soft paintbrush or shoe brush. This method helps to prevent dust from being pushed into the machine either through its vents or beside the loading tray. Don't go overboard with the cleaning at this stage as the machine may need more pressing attention elsewhere.
Check the wiring inside the mains plug and fit a new 3 Amp fuse if you have one. This fuse is the machines last line of defence under fault conditions, and a 13 Amp fuse will provide little or no protection.
Now, power up the unit and listen closely for any unusual noises. The mechanism should go through a reset routine, "TICK-WHIRR-SQUEAK", followed by silence. The clock may or may not start to flash at this point. Loud humming or hissing should be taken as an immediate warning to switch off. If this does happen and you are unfamiliar with the electronics inside a video recorder, now would be a good time to consult someone who is. Otherwise, if everything seems OK, leave the machine on. Don't leave it alone in case it does start to smoke. Unlikely, but possible.
Note:If there is a tape inside the machine already and you hear a frantic flapping noise on power up, then the tape is broken. We'll deal with that problem later. Never leave a tape inside a machine when putting it into storage. Glitching on initial power-up can snap the tape.
Don't attempt to place a tape inside the machine yet. The backup batteries in these machines only hold a charge for a few months. If it's been longer than this since the machine was last used, it may be suffering from amnesia. Yes, amnesia! With a flat backup battery, the microprocessor that supervises the logic control functions for the mechanism can forget what state the machine was in at power down. Chewed tapes are a common result of impatience at this stage. Leave the machine on for AT LEAST ONE HOUR before pressing anything.
Note: If a broken tape has been left in the machine, a fault condition is detected and the machine drops into standby. To remove the tape, unplug the unit from the mains for 5 seconds. Now hold the 'EJECT' button down whilst reconnecting the power. The tape will make frantic flapping noises and the loading tray will lift. This is a fail-safe feature built into the machines software. If you have acquired the machine from someone else who left it in storage and didn't follow the guidelines laid out here for 'waking one up', this may be the reason for the tape having broken in the first place. Another common reason for chew-ups is just a lack of regular servicing.
If the clock hasn't come to life by now, unplug the unit from the mains for 5 seconds and reconnect. If the clock still doesn't light, you may have a dead backup battery. Check it with a multimeter. You may not be able to source an exact replacement but a little ingenuity with cable-ties and link-wires should provide a means of successfully attaching it.
If there has been no activity from the mechanism AND the clock doesn't light up, you probably have a power supply fault. Check the fuse in the mains plug first. If it has blown, you probably have dried out capacitors near the transformer. Change the large electrolytics and check the rectifier diodes. Check the rows of internal fuses near the front of the main board. If any of these have blown, they MUST be replaced with fuses of the same type and rating. If you need access to the bottom of the power supply board, the whole sub-chassis can be removed by taking out three small internal screws and easing the sub-chassis forwards and up. To gain easier access to the front of the main-board whilst in-situ, the front panel can be flopped forward by applying slight outward pressure to the case sides. This machine was designed to be worked on!
Assuming that all is well, press the 'EJECT' button. The machine will come out of standby, and the loading tray should lift with a healthy "TICK-SQUEAK-WHIRR". The 'STOP' LED will light up. The message 'CASS' should appear in the tape counter window. If '0' appears, press the 'COUNTER' button to the right of the tape counter window.
Now for the moment you've been waiting for! Let's stop that damned clock from flashing. Press the small round 'SET CLOCK' button, type in the time (24hr format) on the keypad, followed by 'END'. Ah, bliss!
Try pressing the various transport buttons. All buttons should put the mechanism into its various modes cleanly and quickly and their associated LEDs (if your model has them) should illuminate. Pressing the 'RECORD' button will lift the loading tray and return the transport to 'STOP' mode as the machine knows that it has no tape in it. Press 'STOP' to lower the loading tray.
You could try connecting the V2000 to a television and aerial at this point to ensure that the RF modulator is functioning correctly. The tuner stage should provide normal pass-through mode as any modern VCR does.
To tune your television into your machine, press 'PLAY' and a test signal will be transmitted somewhere between channels 30 and 40. Once you've tuned in your television, press 'STOP' and the keypad can now be used to select viewing channels. If no channels are stored, press 'SEARCH'. Be patient as the scanning can take a minute or so. When a channel is found, press the keypad number key where you want it to be stored and press 'STORE'. Note that '0' is reserved for AV input from the SCART socket.
With a SCART lead attached, the output from your machine should also appear on your televisions AV input. This method will give slightly better picture performance than using the RF output.
Now is a possible time to try playing a tape. I would strongly recommend a thorough cleaning of all the heads, tape guides, pinch roller and capstan first, but if you feel that this is beyond your abilities, you can bypass this at the risk of a 'chew-up' and/or poor picture quality. If you're not confident enough to do it yourself, try to find someone trustworthy who can.
Cleaning Up
For those brave enough to try, here is the routine for cleaning your machine:-Once again, I can accept no responsibility for any damage you do to the machine or yourself during this procedure. Follow the text carefully and mishaps are extremely unlikely to occur.
Now is a good time to remove the machines top cover (3 screws along the back top edge), stand the machine on its left-hand end, and gently brush out any loose dust you can find. Always brush away from the mechanism so as to avoid excessive dust contamination. A vacuum cleaner can be used with extreme caution. Be careful not to bend any components or pull out any connectors. A camera lens puffer-brush is preferable although not everyone will have access to one of these. If it's a fine day, take the machine outside for this cleaning procedure. The dust will blow away rather than hanging around in clouds.
Replace the top cover and give the machine a few minutes for the residual dust to settle before operation.
Cleaning the mechanism
See also Head Cleaning by Doug Dobbins.You will need the following items:-
5mm flat-bladed screwdriver; cotton buds; tape head cleaning fluid
OR isopropyl alcohol(99%).

Note the use of a fresh cotton bud at every stage. There is no point in spreading dirt and contamination from one component to another. Dirt removal is the name of the game. Isopropyl alcohol is preferable to tape head cleaner, but use whichever you have access to.
Ideally, do this job on a table near a window with plenty of natural daylight. Saves the eyes. You could also use a small hand mirror to steer the light onto the part under investigation.
Press the 'EJECT' button to lift the loading tray and disconnect the unit from the mains. Place your thumbs on the fronts of the metal sides of the loading tray. Hook your fingers around the back of the loading tray lid and pull forwards with gently increasing force. Ensure that the force you are applying is to the plastic lid and not the metal loading tray. Give the loading tray lid a side-to-side wiggle and "CLICK-CLICK!", off it pops.
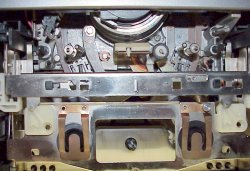
Remove the two screws from either side of the loading tray and lift the metal screening shield clear. Watch out for sharp edges. You now have access to the mechanism. Note the complete lack of any belts or jockey wheels. It's a direct-drive mechanism!
If you would prefer to remove the mechanism from the machine, you will find three screws in the base of the lower case laid out in a triangular pattern. Two near the front, one toward the back. This shouldn't be necessary at the moment but might be of interest to intrepid explorers. You would need to remove the upper case lid first, of course. If you do remove the mechanism, DO NOT twiddle any of the preset adjusters that you come across. These controls have been accurately factory set at the time of manufacture and seldom, if ever, will they require any adjustment. Their purposes and adjustment may be covered in a further article for the benefit of those with the test equipment and technical knowledge required for accurate calibration work.
IMPORTANT! Be extremely careful not to accidentally scratch the head drum. Also, do not poke anything into the small slots around the base of the head drum as these house the video heads.
Check the pinch roller for any signs of perishing or shininess. If it's perished with signs of cracking, you need a new one.
Check the capstan. If the plating is pitted or flaking away, you've reached a dead end.
If the pinch roller is just shiny, try isopropyl alcohol on a cotton bud. If the surface refuses to go dull, remove the pinch roller by carefully removing the nylon retaining collet and lifting the pinch roller clear of its spigot. You may have to resort to wetting a piece of 240-grade 'Wet-or-Dry' abrasive paper with alcohol and scrubbing the pinch roller with it. This may sound harsh, but believe me; I've brought many a duff pinch roller back from the dead using this method. Rotate the pinch roller whilst working on it to avoid creating flat spots. Once you're satisfied with the pinch roller, wash off any debris with more alcohol and replace it on its spigot. Place one drop of light machine oil or brake fluid down the gap between the pinch roller and the spigot and replace the nylon collet. By one drop, I mean one drop. Don't get oil anywhere else. If you do, remove it immediately with isopropyl alcohol.
Now to that capstan. Old capstans on unserviced machines seem to develop crust rings level with the top and bottom edges of the tape path. If you find these, first try rubbing them with isopropyl alcohol on a cotton bud. If they won't shift, try scraping them off with the edge of a two pence coin. The copper coin is softer than the plating on the capstan, so you won't do any damage if you're sensible about it. The capstan spins quite freely, so hold it in place by applying a little downward pressure onto its top retaining circlip with your thumb. You will need to remove the machines main lid and the top screening can from the mechanism to gain access to the top of the capstan if this proves necessary. With practice you can gently rotate the capstan using this method so that you can get all the way round it. Finish off your handy work with a little isopropyl alcohol on another cotton bud.
Clean the audio head. This sits just behind and to the left of the capstan. Once again, isopropyl alcohol on a fresh cotton bud should do the trick. Clean thoroughly in the corners.
The erase head sits to the left of the head drum and should be given the same treatment.
Wipe around the tape guides with another alcohol soaked cotton bud.
The head drum shouldn't need any attention, but gently rotate it by its top edge and look for any brown blobs or streaks of oxide. If you find any, use another alcohol soaked cotton bud and wipe gently in a horizontal direction. Immediately re-wipe these areas with a dry cotton bud to remove any streaky marks left by the mixed oxide/alcohol residue. If you accidentally get any fingerprints on the drum, remove these in the same manner.
At the base of the head drum assembly, on the lower fixed portion, you will see a sloping ledge. This is called the 'ruler edge' and guides the bottom edge of the tape on its journey around the drum. Wipe around it as far as you can reach with another alcohol soaked cotton bud followed by a wipe round with a dry cotton bud. Any oxide or debris around here can cause severe mistracking problems.
Just the video heads left to do. Please be very, very gentle with these heads. If you're not entirely happy about cleaning them, get someone competent at the task to do this job for you. These heads are, to the best of my knowledge, no longer manufactured. Replacement with new ones is not an option.
To clean the video heads, take an alcohol soaked cotton bud and very gently pass the tip of the cotton bud over one video head in a horizontal direction. Rotate the drum and cotton bud through 180 degrees and repeat the procedure for the other video head. DO NOT wipe with a dry cotton bud as loose fibres may get trapped in the head. Allow the alcohol to evaporate for a few minutes.
Replace the screening shield(s) and loading tray lid (and case lid). Finished!
Running Up
Try playing back a tape. If the picture appears noisy at first, let the tape continue to play for a while. If the picture doesn't settle within a minute or so, try making a fresh recording. It's possible that the recording you have may have been made on a very early machine, or one in poor condition. Also, the signal on the tape can 'fade' if it has been stored in unfavourable conditions.The first (and last) minute of a heavily used tape is very often dirty and/or stretched, and mistracking problems are common at the extreme ends of old tapes. Try winding 5 minutes or so into the tape and try again.
If the machine struggles to play back its own recordings, check the condition of the tape. If it has been stored incorrectly or used in a dirty or defective machine, it may have suffered damage. The surface of the tape should be mirror-smooth and completely flat.
Even if the tape appears to be OK, try another one.
If you still haven't managed to make a successful recording by this stage, then it's possible your machine may have either worn out video heads, characterised by a noisy picture with lack of definition and possible frame-slip, or there could be a fault in the DTF system.
Keep your eyes peeled as there may be a series of follow-up articles covering fault-finding and repair if sufficient interest is taken.
Hopefully, you won't have experienced any of these problems and you now have one restored and fully working state-of-the-art V2000 video recorder ready for a serious polishing session.
Have fun!
Next article:
REFURBISHING OLD V2000 CASSETTES - Don't throw away those worn-out/chewed-up tapes.
QUESTIONS? >>> e-mail: [email protected].